Introduction
Deepgram supports a variety of deployment methods, including an on-premises (on-prem) offering, which is an isolated service deployed to customer-requisitioned cloud instances or customer data centers. This guide will walk you through the process of setting up Deepgram on-prem in your own environment.
If you're an IT administrator deploying an on-prem instance of Deepgram, read on for high-level guidance on setup, suggested configuration, periodic maintenance, and frequently asked questions. We will describe all requirements and needed assets for the installation, tell you how to configure your environment and set up your server for the installation, show you how to install the actual Deepgram application, identify important files and directories related to the Deepgram installation, and help you plan your server maintenance and security practices.
Why On-Prem
Using Deepgram as a service has a variety of benefits. First of all, it's extremely fast to start developing with. From signing up, to getting an API key, to getting your first transcription of your audio files can take as little as a minute. Using Deepgram as a service also enables you to avoid all hardware, installation, configuration, backup, and maintenance-related costs.
With that being said, there are situations where an on-prem deployment might make sense. The most common use cases we have seen are when you have stringent security and performance requirements.
Performance
Certain use cases, like AI voicebots, have very sensitive latency and load requirements. If you need ultra-low latency with ASR colocated with your other services, on-prem can meet these requirements.
Security
One of the common use-cases for deploying Deepgram on-prem is to satisfy security requirements. In a typical on-prem deployment, your Deepgram components will contact the Deepgram license server in order to validate the Deepgram components and models, as well as to report usage information. The usage information reported for each request includes the audio duration, features requested, and success response codes. No audio, transcripts, or other identifying markers of the request content are sent to Deepgram.
Components
Before you deploy Deepgram, you’ll need to make effective design decisions about the components of your system, their relationships, and the interactions between components. Ideally, your architecture will meet your business needs, optimize both performance and security, and provide a strong technical foundation for future growth.
Deepgram provides a variety of components available for on-prem deployment. This guide describes how you create a deployment using Deepgram’s required components, API and Engine. If you are interested in learning about and deploying Deepgram’s optional components on premises, such as the License Proxy in the diagram below, see On-Prem Add-ons.
If you aren't certain which components your contract includes, please consult your Deepgram Account Representative.
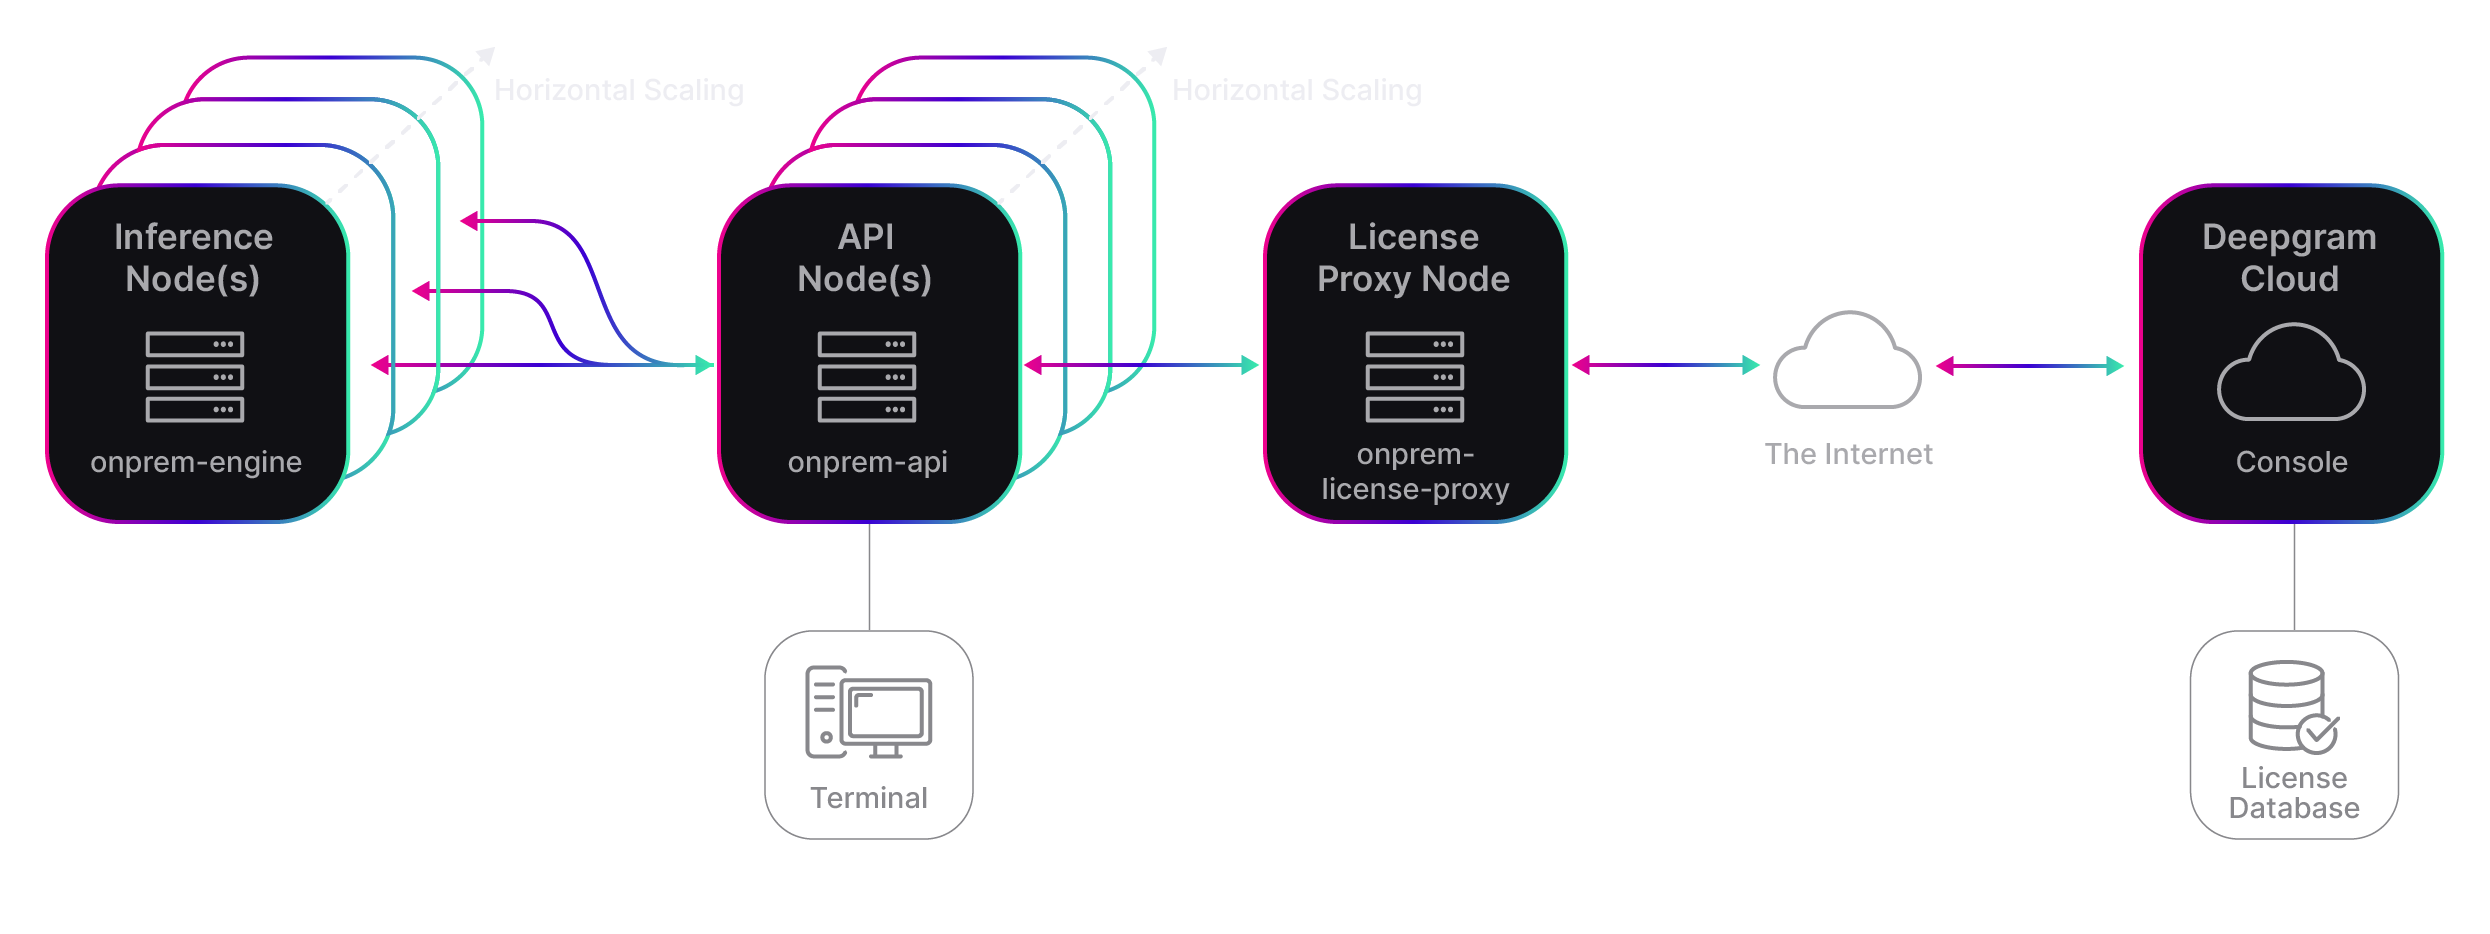
Deepgram API
The Deepgram API, listed above as onprem-api, interfaces with the Deepgram Engine to expose endpoints for your requests.
Deepgram Engine
The Deepgram Engine, listed above as onprem-engine, performs the computationally intensive task of speech analytics. It also manages GPU devices and responds to requests from the API layer. Because the Deepgram Engine is decoupled from the Deepgram API, you can scale it independently from the API.
Prerequisites
To take advantage of our on-prem product offering, you will need to enroll in a Deepgram Enterprise Plan. If you're interested, please contact us! You'll be promptly connected with a Deepgram Account Representative who will help you every step of the way, from proof-of-concept to a full production environment.
Your Deepgram Account Representative will guide you through the process of setting up:
- a Deepgram product contract
- a Deepgram Console account if you don't already have one. This lets use connect your contract to your projects and allows you to generate credentials for your on-prem deployment
Ahead of your planned on-prem deployment, your Deepgram Account Representative will need:
- your Deepgram Console account email address
- your Deepgram Console Project ID
Providing this information will allow Deepgram to supply:
- download links to your customized configuration files
- download links to required models, including at least one pre-trained AI model for testing purposes
Detailed troubleshooting and on-demand support require an on-going support contract with Deepgram.
Initial Setup
To setup your on-prem deployment environment and successfully run Deepgram products for the first time, the guides in the "On-Prem Deployments" section will take you through step by step.
Starting with this guide, you can use the "What's Next" section at the bottom of each page to take you from one guide to another until you have a working environment. Unless specifically indicated, each step in a given guide is required - skipping steps will leave you with an incomplete or broken environment.
As an example workflow, if you have a bare-bones deployment on AWS for a Proof-of-Concept, you would complete the following guides in order:
- Deployment Environments
- AWS
- Drivers and Containerization Platforms
- Self Service Licensing & Credentials
- Deploy Deepgram Services
At the end of these guides, you should be able to make an inference request, and our proof-of-concept is complete!
Updated 5 months ago
Our next step will be to start talking about your deployment environment.