Live Streaming Starter Kit
If you’re looking to get started with Deepgram’s audio streaming capabilities, this is the perfect place to begin. The starter kit provides sample code that allows you to easily stream basic audio to Deepgram, ensuring that you have the necessary foundation to build for your unique use case.

Once you’ve tested out the basics of streaming audio to Deepgram, you’ll move on to using an included mock server for testing. This allows you to focus on getting your audio and client code right. Once you’re confident that your audio stream is configured correctly and you’re streaming the audio you expect, you can easily swap to sending that audio to Deepgram’s service.
Before diving into writing code from scratch, we highly recommend running through the steps in our starter kit at least once to ensure that you can stream sample audio to Deepgram successfully. This will help you avoid many potential issues and streamline the integration process for sending your own audio to our system.
The starter kit includes many ways to help diagnose problems including more details on errors as well as steps to fix the errors you encounter.
Set Up
Prerequisites
You must have:
- Python >= 3.6+
- portaudio, if you plan to stream audio from your microphone
- A valid Deepgram API key (you can create one in our Console)
Installation
- Clone the Live Streaming Starter Kit repository
- Install portaudio
pip install -r requirements.txt
Installing PortAudio
If you use Homebrew or Conda, we recommend installing PortAudio withbrew install portaudio or conda install portaudio.Otherwise, you can download a zip file from portaudio.com, unzip it, and then consult PortAudio’s docs as a reference for how to build the package on your operating system. For Linux and MacOS, the build command within the top-level portaudio/ directory is ./configure && make.
PortAudio is known to have compatibility issues on Windows. However, this dependency is only required if you plan to stream audio from your microphone. If you run into issues installing PortAudio, you can still complete the other tasks outlined in this guide.
Streaming a Local Source
The first step in getting started with Deepgram’s audio streaming capabilities is to learn how to stream a local audio source to Deepgram. This task allows you to learn the basic concepts of how Deepgram’s API works without worrying about complexities that arise with other audio sources. Additionally, it ensures that you can receive results from Deepgram in your development environment.
The starter kit provides sample code that facilitates this process. Before building your own integration, we recommend running this code at least once to make sure that you can stream audio to Deepgram successfully.
If you’re already confident you can stream audio to Deepgram and receive transcriptions, you can skip to 3. Streaming Your Audio.
Stream a File
While streaming a file isn’t our recommended way to use Deepgram’s real-time transcription service (we suggest our pre-recorded API for that), it’s a quick and easy way to make sure your API key and network are functioning correctly.
Just run the following command:
python test_suite.py -k YOUR_DEEPGRAM_API_KEY
You may need to use the command python3 instead.
Make sure to replace YOUR_DEEPGRAM_API_KEY with an API key generated from our Console.
This will stream the included file, preamble.wav, to Deepgram and print out transcripts to your terminal.
You can also stream your own WAV file by running:
python test_suite.py -k YOUR_DEEPGRAM_API_KEY -i /path/to/audio.wav
To check out how this functionality is implemented, look at the conditional elif method == 'wav' in our sender function.
Self-hosting a Deepgram deployment? You can provide your custom URL to the test suite with the --host argument.
Stream Your Microphone
The starter kit also has the ability to send audio from your microphone to Deepgram for transcription.
First, make sure pyaudio and its portaudio dependency are installed, and you have a microphone connected to your computer. Then, run:
python test_suite.py -k YOUR_DEEPGRAM_API_KEY -i mic
Additional Options
The following arguments can be appended to any test suite command.
Parameters
--model/-m: Specify a Deepgram model. Example: --model phonecall. Defaults to general.
Timestamps
--timestamps/-ts: Opt-in to printing start and end timestamps in seconds for each streaming response. Example: --timestamps
Sample output line with timestamps:
Subtitle Generation
In addition to printing transcripts to the terminal, the test suite can also wrap Deepgram’s responses in two common subtitle formats, SRT or VTT.
To generate SRT or VTT files, add the -f/--format parameter when running the test suite:
python test_suite.py -k YOUR_DEEPGRAM_API_KEY [-i mic|/path/to/audio.wav] [-f text|vtt|srt]
This parameter defaults to text, which outputs responses to your terminal.
If you were able to successfully stream local audio and receive a transcript, you’re ready to move on to the next step!
Streaming a Remote Source
The next step in getting started with Deepgram’s audio streaming capabilities is to learn how to stream a remote file to Deepgram. This task introduces slightly more complexity and requires managing multiple asynchronous remote sources—one for audio input to Deepgram, one for Deepgram’s transcription output.
Stream a URL
Make sure you have the URL for direct audio stream to test with. A good way of testing this is to open the URL in a browser—you should see just the built-in browser audio player without an accompanying web page.
Here are two URLs for you to try:
- BBC World Service: http://stream.live.vc.bbcmedia.co.uk/bbc_world_service
- France Inter: https://direct.franceinter.fr/live/franceinter-midfi.mp3
If you use the French channel, be sure to add language=fr to your Deepgram URL.
Then, run the test suite to see the results:
python test_suite.py -k YOUR_DEEPGRAM_API_KEY -i http://stream.live.vc.bbcmedia.co.uk/bbc_world_service
To check out how this functionality is implemented, look at the conditional elif method == url in our sender function. We use the aiohttp library to make an asynchronous request and open a session, then send content to Deepgram.
Streaming Other Audio
Now that you’ve validated you can stream WAV files and URLs to Deepgram, it’s time to start the process of integrating other audio sources, so you can build something with Deepgram that’s tailored to your business needs. To do this, we’ll start by taking a step back…and removing Deepgram from the picture!
Let’s set the test_suite.py file aside for the moment. In addition to that file, the test suite also comes with a mock server and client: server.py and client.py. These are intended to create the simplest possible environment to test your custom audio.
The mock server exposes a similar interface to Deepgram’s streaming service. It accepts websocket connections that specify an encoding, sample rate, and number of channels; and it expects a stream of raw audio. However, it doesn’t transcribe that audio. All it does is send back messages confirming how much audio data has been received, and once the client closes the stream, it saves all sent audio to a file.
Using the mock server for testing allows you to focus on getting your audio and client code right. Once you’re confident that your audio stream is configured correctly and you’re streaming the audio you expect, you can easily swap to sending that audio to Deepgram’s service.
Run the Mock Server
Start by running the mock server:
python server.py
Then, open another terminal window and prepare to run the mock client.
The mock client accepts these parameters:
python client.py [-i INPUT] [-e ENCODING] [-s SAMPLE_RATE] [-c CHANNELS]
The starter kit comes with a raw audio file, preamble.raw , that you can use to test streaming to the mock server. You can stream preamble.raw with the mock client like so:
python client.py -i preamble.raw -e linear16 -s 8000 -c 1
When you run the mock client, you should see output confirming that the mock server has begun to receive your audio.
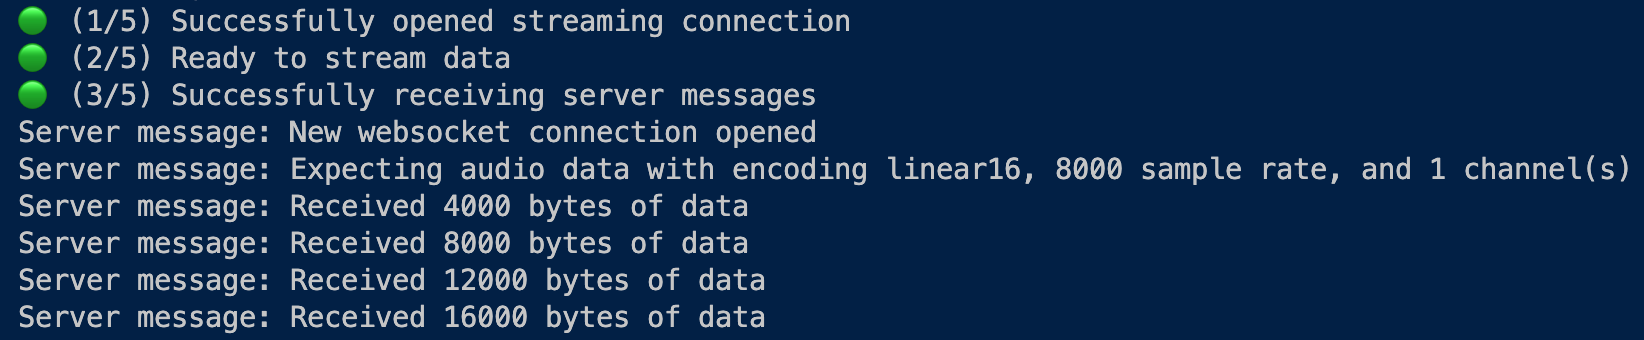
For a list of valid encodings, see our endcoding documentation.
Validate Your Audio
At the end of an audio stream, the mock server saves all audio data that was sent in a RAW file. It will return the filename to you at the end of the stream.

You need to ensure the audio the server received is the audio you intended to send. To validate this, open this file in a program like Audacity (specifying necessary parameters like the encoding and sample rate) and try to play it back. You should be able to listen to your audio and verify it’s correct.
Stream to Deepgram
Once you verify your audio is correct, you can try streaming that audio to Deepgram. To do so, simply swap the websocket URL in client.py to point to Deepgram—the correct URL is left in a comment for you.

Don’t forget add your DG API key to the websocket headers where it says YOUR_DG_API_KEY.

If you were able to stream to the mock server, and have validated your audio sounds correct, you should be able to seamlessly start receiving transcriptions from Deepgram.
Wrap-Up
By following the starter kit steps, you’ve built your knowledge of working with websockets, audio, and Deepgram’s system. We hope this guide has enabled you to build your own custom audio integrations with confidence.